Finalizer
Analyzer
Monitor Output
The Monitor Output is different from the audio track Export and Master Meter, in that it features different monitor-only options like a monitor output fader, Dim, Mono Sum, plus the important Loudness Compensation. Audition functionality, such as soloing a band in the multiband compressors, is also only routed to the Monitor Output.
Monitoring with Loudness Compensation
The only good way to get solid and consistent mastering results is to judge spectral and dynamical differences at an equal loudness level. Otherwise, we may initially be drawn to prefer the loudest, which is one of the issues underlying the Loudness War and a route taken only with great caution.
The Loudness button in the Monitor section will automatically make everything (A, B, REF) equally loud and identical to the Prepared Normalization Level while playing back without the need to adjust a lot of gains. The background analysis calculates the correct compensation gains.
Note that the Loudness compensation only applies to the monitor signal – and the meters and SDC view etc. The Loudness compensation will never affect the processing that is exported to file. Also note that the AVG view is always loudness compensated and is not effected by the Loudness button in the Monitor section.
When you are at the final stage of mastering where you need to compare at the actual and intended output level, you should disable the Loudness Compensation. Now the Reference files have the original loudness level, and the project audio file output level can be defined using the Limiter gain or loudness parameters.
Tip:
- Calibrated monitoring levels: Using constant and calibrated monitor controller volume settings, will complement the Loudness Compensation, in the strive to do consistent evaluation of your work, based on a constant monitoring Sound Pressure Level.
- The current setting of Loudness Compensation, Mono Sum and so on, in the Monitor Section will never affect what is printed to file with the Export Module.
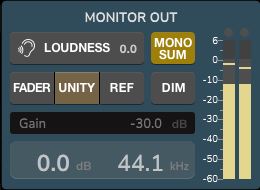
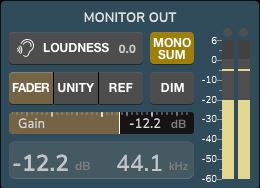
The example below shows a typical Monitor Output display:
- Loudness Compensation: When activated, all audio including A, B and REF files, are loudness-normalized to the Prepare Module Normalize Level. This is essential for judging all changes made, without the need for fine tuning a lot of gain parameters.
- Mono Sum: will make a mono version of the signal with the same level as its stereo version.
- Fader: will enable the monitor output fader parameter if, for example, there is limited access to the monitor volume control. The fader is accessed by clicking and dragging in the horizontal rectangle directly below. The horizontal fader bar and dB value will change as you drag.
- Unity: will disable the monitor output fader and make it bit transparent for high quality calibrated monitoring.
- REF: will make use of the Reference Gain in the Preferences/General Menu. The Reference Gain may be used for calibrating the monitoring level, if such a parameter is not available in the monitor output chain.
- DIM: will turn down the monitor output level by the Dim Gain amount set in the Preferences/General Menu (see below).

- The Gain dB readout at the bottom left of the Monitor Output display shows the current output gain applied, which is a combination of the Loudness Compensation gain, Output Fader gain, REF level and DIM setting.
- The Sample Rate readout shows the project sample rate, which is defined in the Prepare module.
- The PPM meter for the monitor output shows the signal sent to your monitor path. Most of the time it will show signal identical to the Finalizer Master meter but while you work, the Limiter may temporarily be bypassed and output signal may cross 0 dBFS. This is why the scale goes to +6 dB. Above the meter there is a sticky Peak lamp indicating that 0 dBFS has been exceeded. It may be reset by clicking on it.
Note: Should you experience temporary clipping in the monitor output path, you can reduce this using the Monitor output Fader. If you experience multiple or nearly continuous clipping in the monitor path, you may consider lowering the Normalize Level in the Prepare module and this way reserve more margin in the monitor path while you work.